Simple Eyelet baby blanket -free pattern

Hello everyone!

Life has been quite full lately, so I didn’t have a lot of time to update my blog.

To make you all forgive me for my prolonged absence, I decided to post a free pattern for you knitters to enjoy.

The Summer is over, and we can start thinking about knitting cozy wolly blankets once again.

I had a couple of balls of chunky yarn staring at me for quite some time. I don’t even remember where or when I purchased them (let’s say it was so long  ago, that the yarn maker discontinued this shade – eeeek!!).  I loved the subtle hues of this yarn: they are clearly visible, but they are not too strong to distract the eye.

I don’t often work in chunky yarn. As you might have noticed from my past projects, I enjoy lace and fine yarns the most. Nevertheless, I also appreciate how fast and cosy the chunky knits are.

Knitting this blanket was a funny project for me, mainly because it took shape while I was working it. There was no real planning, the choice of which stitches to use just came to me naturally.

Now, I am not suggesting that I am a yarn listener (or maybe I would like to be a yarn whisperer) but sometimes I think it is fun to let our imagination take control and let our needles guide us along the way.

So after a few rows of garter, and some more of stockinette stitch I decided to add a very simple eyelet motif.

I think simplicity paid it off this time. I really liked the contrast of the chunky yarn and the lightness of the eyelets.

So I wrote down the pattern for all of you to try, hopefully it will make sense, since as I said before it was quite an improv knitting experience for me.

Simple Eyelet Baby Blanket

The finished blanket will measure approximately 60 x 57 cm once blocked.

Materials:
2 x 100g balls of Cygnet Grousemoor Chunky Yarn (25% wool – 75% acrylic) of your preferred shade. You can use another chunky yarn that meets the gauge.

1 pair of 5,5 mm knitting needles (you may use circular needles if you prefer, but you will knit flat)

tapestry needle to weave the ends in

Gauge:

10 cm / 4 inchess = 15 sts / 20 rows

Stitches used:

Garter : Knit all on RS and WS of the work

Stockinette Stitch: Knit on the RS and purl on the WS

Eyelet Pattern: See chart

Execution:

Cast on 90 sts.

Work 6 rows in garter.

K5 at each end, work 4 rows in stockinette stitch.

K5 at each end, work the eyelet pattern, plus K2 at the end of the 13 repetitions.

Repeat the eyelet pattern, which is composed of 8 rows for each repeat (in the chart you see the stitches worked on the RS. On the WS keeping the first and last 5 sts in garter purl all the stitches). Repeat the eyelet pattern 12 times (96 rows in total).

K5 at each end, work 4 rows in stockinette stitch.

Work 5 rows in garter, on the WS knit all the stitches while binding off.

Weave the ends in and block to measure.

Eyelet pattern chart:

  repeat 13 times, then at the end of the RS row + k2

Eyelet pattern written instructions:

Worked on the central 80 stitches

Row 1: (k4, k2tog, yo) repeat 13 times, + k2

Row 2: k5, p80, k5

Row 3: (k3, k2tog, yo, k1) repeat 13 times, + k2

Row 4: k5, p80, k5

Row 5: (k2, k2tog, yo, k2) repeat 13 times, + k2

Row 6: k5, p80, k5

Row 7: (k6) repeat 13 times, + k2

Bonus picture:

Please send me your feedback, I would love to hear your experience with this pattern 🙂

Happy knitting!


Edit: 23/03/2018

Since some of you were confused by my written instruction I decided to edit the original post and to add a more extensive explanation. I hope it helps! Happy knitting!


Disclaimer:
Simple Eyelet Blanket is an original design by Simply Yarn
© 2015 Simply Yarn. I have created this as a pattern for personal use. Items made from this pattern may be sold, but the creator of the design should be credited. No part of this pattern may be reproduced, stored in a retrieval system, or transmitted in any form or by any means electronic, electrostatic, magnetic tape, mechanical, photocopying, recording or otherwise without prior permission of the copyright owners having been given in writing. Please contact me at simply.yarn@gmail.com for further information.


Free cat toy crochet pattern… upcycle and entertain your kitty at the same time.

Happy New Year!
I was hoping to make this post before Christmas, just to offer you all the chance to create a simple and fast crochet cat toy for your own kitty, but as usual life happens and I didn’t manage to do so.

I hope you will enjoy the pattern anyway and hopefully your furballs will enjoy it even more.

This is the final look of the cat toy:

To make your own you will need:

  • 4 mm crochet hook
  • scraps of DK yarn in 2 shades (A & B)
  • 1 toilet paper tube
  • 1 small organza bag (or small piece of light fabric tied up)
  • catnip
  • 1 small jingle bell (optional)
  • tapestry needle to weave the ends in

The toy is worked from the bottom up, in spiral rounds, so there is not join slip stitch at the end of each round.

Round 1: With colour A work 6 sc in the magic ring (6 scs)

Round 2: work 2 sc in each sc (12 scs)

Round 3: work *2 sc in the next sc, 1 sc* – repeat till the end of the round (18 scs)

Round 4: work *2 sc in the next sc, 2 sc* – repeat till the end of the round (24 scs)

Round 5: work *2 sc in the next sc, 3 sc* – repeat till the end of the round (30scs)

Round 6: work 1 sc in each sc in the back loop only (30 scs)

Round 7 & 8: work 1 sc in each sc (30 scs)

Round 9: Change to colour B ch 2, 1 hdc in each sc, (30 hdcs)

Round 10: Change to colour A, work 1 hdc in each hdc (30 hdcs)

Round 11 – 18 Repeat rounds 9 and 10 (total 10 rounds of hdcs)

Round 19 & 20: work 1 sc in each hdc (30 scs)

Round 21: work 1 sc in each sc in the back loop only

Round 22: work *2 sc tog in the next sc, 3 sc* repeat till the end of the round (24 scs)

Round 23: *2 sc tog in the next sc, 2sc* repeat till the end of the round (18 scs)

Fill the bag or the fabric with catnip and place it inside the paper tube

Round 24: *2 sc tog in the next sc, 1 sc* repeat till the end of the round (12 scs)

Round 25: 2 sc tog till the end of the round ( 6 scs)

Round 26: ch 30, cut the yarn leaving more or less 35 cm long tail (or enough for you to work a slip stitch into each chain) with the aid of the tapestry needle thread the yarn through the jingle bell, slip stitch in each ch stitch.

Secure the yarn tightening the center of the last round. weave the ends in.

This toy has been tested on all of our 5 cats… in particular Nimue and Romeo have really appreciated the tail of the toy with the jingle bell.

A new adventure for me! Introducing the Galaxy Cowl!

Hello everyone.
As I had anticipated in my previous post it is time for me to share some exciting news.

I have opened an Etsy shop and I also added a pattern for sale on Ravelry!

Since I enjoy knitting and crochet so much I thought it was time to see if my makes would be interesting to others.

I was reassured by the nice results that some of my free patterns had on Ravelry (if you fancy a visit to my pattern store in there, just click here).

Yes, I totally understand that everything that comes for free is more interesting than when you need to pay for it, but I also thought it was time for a new challenge!

Ravelry is such an important source for us knitters and crochet enthusiasts that I have to admit it is a little intimidating to upload something there for sale and hoping that others will love my own design as much as I do. Nevertheless I loved this project so much I decided to take a leap of faith and publish its pattern for sale.

This is what I named The Galaxy Cowl.

It is knitted in round with RIco Design Galaxy Chunky yarn which has sequins already attached to it. I love the spiral effect of the running rib. The colours and the softness of this yarn really fascinated me.

I also loved the fact that since I worked it in round the cowl was also totally reversible.

The pattern is available for sale as digital download. I wrote down the instructions for both knitting in round and knitting on straight needles, trying to made it available for everyone. Of course, if you knit it flat you will have to sew the side and the seam will be the back of the garment. If you want to purchase it you can just click on the following picture and you will be redirected to Ravelry.

The same pattern as a PDF is also availbe as a listing on Etsy. In there I also put on sale items that I made either from commercial or my own patterns. I am exploring new ranges, so besides my beloved garments and accessories, I also added some home decor ideas.

The Spring has begun, Summer is just behind the corner… I am confident that many more items will appear on my listings.

I am really excited about this, so even if you don’t want to buy anything, but you feel like you wish to give me some feedback I will be glad to hear from you.

Now without further delay, i give the almighty LINK to visit my Etsy shop. I will post updates in here about the making of some of the objects, so if you are patient and you are interested you will also find the pattern of my own original designs.

Speak soon, now I run out to enjoy the sunshine!

The charm of knitting socks.

I too have my own personal knitting fears.

SOCKS

I always admired those knitters who were able to knit sock after sock after sock effortlessly, because I felt I was totally useless when it came to socks. (Trust me, I had attempted several times, and I have only obtained something shaped like boomerangs).

Sock yarns come in many beautiful shades, they look so delicate and precious. On Facebook too, I saw many people flaunt their hand made sock yarns and I always felt I would be unable to make them justice.

But a few weeks ago I entered a charity shop and I thought I received a sign from the knitting gods: they were selling (almost for nothing I have to admit) several balls of Rico Superba Stripy sock yarn.

I was meant to have them as my time for tackling socks had come! I got so overexcited that I bought all the EIGHT balls they had available (sigh!).

Since my passion and interest for socks had started a long time ago I already had a few knitting magazines entirely devoted to socks patterns. Going through one I had bought in Italy I was struck by a super girly design. Looking a little more into the pattern I discovered they had published this DROPS DESIGN pattern (simply click the link to get it).

I got the sock yarn, I got my set of 5 DPN 3.0 mm needles … my sock adventure begun.

I loved the little lace pattern, it was really super easy to follow and I thought the result was quite remarkable.

This pattern was great because after finishing the lace ankle decoration I simply had to reverse the knitting inside out and continue to knit the rest of the sock.

The heel was a straight one, so no problems there. The picking up of the stitches to work the gusset was more or less smooth too (even if the second socks benefited from the knowledge I acquired by doing of the first one).

After the tricky bits the long marathon of knitting the length of the foot begun, but the stripy yarn kept me entertained.

I have to say I really like working in rounds. I love to see the knitted fabric all in one piece. There is no greater satisfaction to me than knowing I won’t have to sew the pieces together. No really, look at it.. so pretty and even!

When I finished the first sock I was really thrilled. I tried it on to check the size and it fit perfectly (I wear size 38 shoes – European). The only not so cool fact about socks is that you need to repeat exactly the same pattern twice. Repetition is not my forte…

In addition since I am not able to work on only one project at the time, it took me a few weeks to complete the pair. But lo and behold, I managed to knit my first ever pair of socks!! (before blocking).

I was a little concerned because they felt a little stiff and not soft at all. The composition of the yarn is 75% Superwash wool and 25% Polyamide so I was expecting them to feel different.

All my worries were literally washed away after the first wash for the wet blocking. As they touched the water they became super soft and snuggly.

The only problem left was taking a good picture of my feet with them on… I refuse to buy a selfie stick just to take a better picture of my socks, so I am sorry this weird perspective picture has to do.

Warm happy feet !

If you have tricks and tips to share about knitting socks I will be more than happy to hear them!
Happy knitting!

Purple, mon amour!

The other evening I was attending my local Knit and Natter group at The Sewing Shop in Lichfield and, as usual, at the end of the evening before leaving I had a good snoop around looking for new yarns.

I was looking at cotton balls because being in the Summer, working with wool it had proved to be a little uncomfortable. We are experiencing a heat wave here in the UK and knitting – or crochet – with sticky hands is not recommended (it could have also been the fantastic strawberry cream tarts that were served to us that night to make my fingertips sticky, ut I refuse to believe so).

Anyhow, I was scrolling through the shelves and there is saw it… this fantastic shade of purple (photo “stolen” from Loveknitting website).

To tell the truth I had seen it last month, but since I was trying to follow through with the good intention of not going to buy more yarn before clearing out most of my stash (like if this is really going to happen, ever), I had forced myself to turn away and leave it behind.

In our household we have a simple rule to counteract impulse buying. If you see something you like, you wait a few weeks before purchasing it, so you are really sure that you TRULY want it. This simple rule saved me several times from buying crazy things that on the heat of the moment seemed vital to me, and then turned out to be totally unnecessary.

I told myself I had waited a month, a WHOLE MONTH and I still really wanted that ball of yarn… so I proceeded with the purchase (the ball then magically disappeared to the bottom of my knitting bag, so the boyfriend didn’t notice – mischief achieved).

I have a thing for purple, I am not going to deny it. I could knit and crochet just in different shades of it, but in these last months I started to appreciate bold colours and this was the perfect occasion to try once again.

Lately I have been doing several little purses that I intend to bring to an event I will take part to in September, so following the mood of the month I created this little satchel purse.

It measures 14 cm in total and the base is 13 cm x 7 cm (more or less).

I worked it in round because it was faster, I could switch colour easily (especially the single yellow row), and because I really loathe sewing the seams together!!

This was my first attempt at making a ribbed cover for the cord (I usually create eyelets and weave the cord in and out) and I am really happy with the result. I found  to pass the cord through a little challenging, but with the aid of a safety pin the cord was easily put in place.

Last note, I bought these beads over a year ago… they were lovely but the hole to pass the thread in was so small I was never able to use them in any of my projects. Today I decided to get creative: I split the yarn in half and I was able to sew them on. Victory! I really like their look at the sides of the cord.

What more to add? I simply fell in love with this project, and I plan to replicate it in different colours and maybe making small additions to it.  Want to have a go too? Find the pattern on Ravelry on my Simply Yarn design page!

Cat coasters, because you never have enough cat themed stuff around.

I share the love for yarn with many of my real life friends, We share and we discuss many different ideas, patterns and techniques.

In fact, It is not uncommon to send each other pictures to tempt ourselves into prove we can always come up with something new.

My best friend and I also share the love for cats, so when she sent me the picture of these cat coasters I fell in love with them in an instant.

Cat crochet

They were linked to me from a Facebook page, that in its turn redirected to a craft website. The bouncing from website to another wasn’t finsihed. These coasters were indeed featured in the Etsy page of Shanna Compton called hooks and balls.

I think it is important to give people credit for their work, especially if their work inspire you to create something similar.

RIght, now that I had uncovered the origin of the idea I decided to make a different version of it that would suit my taste better (I love the originals but I thought the pink in the centre was too much of a graphic detail). I also decided to make a simplified version of the different colors, maintaining a single color block for each one.

Luckly I had some Stylecraft Classique DK Cotton in the shades of white, orange (Seville) and beige, plus a small amount of some black coton of the same weight.

Making one coaster really does not take much yarn so you could also try and use the leftover you have around. Free your imagination, there are all different sorts of cats in the world, and this is your chance to portray them .

Right, this is what my 4 cats look like.

I free handed the body and the other bits of the black one, as you can see, since it looks a little different from the other three. As I made the black one though, I realized it was a nice quick project that I could write down for you to try your hand on. This is why the other three have a more consistant shape. As usual, I hope you can have fun making them, and let me know if you have any comment or suggestion about the pattern.

Happy crochet!

Use 4 mm crochet hook.

In magic ring work 6 sc.

Round   1          Work 2 sc in each sc (12 sc)

Round   2          Work * 1 sc in next sc, 2 sc in the next sc * repeat ** till end of the round (18 sc)

Round   3          Work * 2 sc in next 2 sc, 2 sc in next sc * repeat ** till end of the round (24 sc)

Round   4          Work * 3 sc in next 3 sc, 2 sc in next sc* repeat ** till end of the round (30 sc)

Round   5          Work * 4 sc in next 4 sc, 2 sc in next sc* repeat ** till the end of the round (36 sc)

Round   6          Work * 5 sc in next 5 sc, 2 sc in next sc* repeat ** till the end of the rond (42 sc)

Round   7          Chain 10, from 2nd chain from hook work 9 hdc, 1 hdc in the next sc (tail)

Round   8          Work 14 sl st in the FLO of next 14 sc

Round   9          Chain 5, from 2nd chain from hook work 4 hdc, 1 hdc in the next sc (leg)

Round   10        Work 7 sl st in the FLO of next 7 sc

Round   11        Chain 5, from 2nd chain from hook work 4 hdc, 1 hdc in the next sc  (leg)

Round   12        Work 20 sl st in the FLO

Round   13        Cast off and weave ends in


The tail and the legs chains always start on the first of the 2sc in the same sc of the previous round, the 1 hdc after the ones worked in the chain is worked in the 2nd sc of the 2sc in the same sc of the previous round.

 One more picture of the detail of one of the cats to help you interpret the pattern.

” alt=”” />


Drawers or Wardrobe fresheners – Stash buster mini project. Free pattern

Today I decided to present you an easy project to get rid of the yarn leftovers that lay at the bottom of our yarn containers.

It is a fact that we find it difficult to depart from the yarn that is left behind after our bigger projects have been finished, mainly because in our eyes it really feels like a true crime to throw away perfect good yarn (even if in little amount). At least this is how I feel.

I am always happy to work on quick knits because they also allow me to experiment with new free hand designs and they are perfect to donate for small charity sales. I am preparing some items to donate for my local charity so I went scouting in the depth of my yarn stash for the little forgotten yarn balls.

I found some really nice cotton in two shades (prewinkle and pale rose) which was gifted to me from my mom called TRIFOGLIO ritorto; the maker is Coat Cucirini but on their website this variety is not even mentioned anymore (I believe it was discontinued – my mourning session about it will be expressed in another post).

I also exhumed some Rico Design Essential (white – Weiss) and some Stylecraft Classique Cotton (saville).

I decided to create some drawer or wardrobe freshener as they are quite a versatile project when the perfume of the filling is dissipated (if you like the pouch it can also be used as a jewelry bag or a phone cozy).

So I set to work and these are the designs I came up with.

I filled them with some green apple pot-pourri I had in the house, lodged safely into a small (and cheap) organza bag to prevent any spillage.

This is a knitted pouch.

This is a crochet pouch.

It occurred to me that this would be also a perfect occasion to try and write down a pattern to share with you. I am aware it is a really simply design, and many of you would be able to replicate it with no instructions, but I also know there are many beginners out there looking for inspiration, and a small project like this might be temtping for them.

Materials:

Set of 4 DPN needles 3.0 mm

Crochet hook  3.0 mm

Scraps of yarn ( I used about 20-25 g cotton per pouch)

Darning needle

Organza pouches

Lavander / Pot-pourri for the filling


Perwinkle pouch, diamond eyelet.

CO 40 sts, join in round

Divide the stitches in the following way

needle 1:            20 sts,

needle 2:            10 sts,

needle 3:            10sts.


Round 1 Knit

Round 2 Purl

Round 3 Knit

Round 4 (k2, k2tog, yo) all the way around

Round 5-10 Knit

Round 11 Needle 1: k7, k2tog, yo, k2, yo, skpo, k7; needle 2 & 3 Knit

Round 12-13 Knit

Round 14 Needle 1: k6, k2tog, yo, k4, yo, skpo, k6; needle 2 & 3 Knit

Round 15-16 Knit

Round 17 Needle 1: k5, k2tog, yo, k6, yo, skpo, k5; needle 2 & 3 Knit

Round 18-19 Knit

Round 20 Needle 1: k4, k2tog, yo, k8, yo, skpo, k4; needle 2 & 3 Knit

Round 21-22-23 Knit

Round 24 Needle 1: k4, skpo, yo, k8, yo, k2tog, k4* ; needle 2 & 3 Knit (*edited on 26/02/16 thank you Stargrace!) 

Round 25-26 Knit

Round 27 Needle 1: k5, skpo, yo, k6, yo, k2tog, k5; needle 2 & 3 Knit

Round 28-29 Knit

Round 30 Needle 1: k6, skpo, yo, k4, yo, k2tog, k6; needle 2 & 3 Knit

Round 31-32 Knit

Round 33 Needle 1: k7, skpo, yo, k2, yo, k2tog, k7; needle 2 & 3 Knit

Round 34-38 Knit

Rearrange the sts on needle 2 & 3 on the same needle, using the 3 needles method, bind off.

With the crochet hook make a chain of 90 sts (or your desired length) to create the cord for the pouch.

Weave all the ends in.


White pouch, fern eyelet. *indicates the new pattern instructions, after spotting a mistake in the original pattern 

CO 40 sts, join in round

Divide the stitches in the following way

needle 1:            9 sts,*

needle 2:            22 sts,*

needle 3:            9 sts.

Round 1 Knit

Round 2 Purl

Round 3 Knit

Round 4 (k1, k2tog, yo) k1 all the way around

Round 5-7 Knit

Round 8 Needle 1: k9; needle 2: k6 (k2tog, yo)twice, p2, (yo, skpo) twice, k6; needle 3: K9

Round 9 K19, p2, k19

Round 10 Needle 1: k9; needle 2: k5 (k2tog, yo)twice,k1, p2,k1, (yo, skpo) twice, k5; needle 3: K9

Round 11 K19, p2, k19

Round 12 Needle 1: k9; needle 2: k4 (k2tog, yo)twice, k2, p2, k2, (yo, skpo) twice, k4; needle 3: K9

Round 13 k19, p2, k19

Round 14 Needle 1: k9; needle 2: k3 (k2tog, yo)twice, k3, p2, k3, (yo, skpo) twice, k3; needle 3: K9

Round 15 k19, p2, k19

Repeat round 8- 15 5 times

Round 32-34 Knit

Rearrange the sts on needle 2 & 3 on the same needle adding a sts from needle 2 at the two sides, then using the 3 needles method, bind off.

With the crochet hook make a chain of 90 sts (or your desired length) to create the cord for the pouch.

Weave all the ends in.


Orange pouch

With the crochet hook chain 40 sts and join in round.

Round 1 ch 1,sc all around, join with a sl st

Round 2 ch 1,sc all around, join with a sl st

Round 3 ch 3 (counts as a 1dc+1ch), *skip next st, 1dc in the next st* repeat ** all the way around, join with a sl st

Round 4 ch1, *sc in ch of the space, sc in the next st* repeat ** all the way around, join with a sl st

Round 5-6 ch 1, sc all around, join with a sl st

Round 7 ch 2, hdc all the way around,join with a sl st

Round 8 ch 1, sc blo all the way around,join with a sl st

Round 9 ch 1, sc all the way around,join with a sl st

Repeat round 7-9 three times

Round 16 ch 1, sc blo all the way around,join with a sl st

Round 17 ch 1, sc all the way around,join with a sl st

Bring the two sides of the pouch together and sew them together working a sl st through the internal loop of each stitch.

Make a chain of 90 sts (or your desired length) to create the cord for the pouch.

Weave all the ends in.


That’s all folks, if you spot any error on my pattern or if you feel like commenting on it, please let me know. Constructive criticism makes my world go round 🙂


When knitting meets charity – Penguins!

Yarn lovers unite!
Today I am happy to share a beautiful initiative that I am sure will make my fellow knitters go “awwwwww”.

Today on my Facebook feed I read about a new charity project that really warmed my heart, so I decided to share it, in the hope to reach many other knitters and animal lovers.

It is sponsored by the Penguin Foundation an Australian association that is trying to preserve, study and reabilitate penguins.

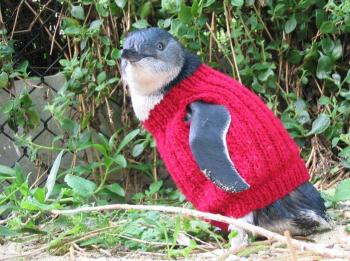
They are collecting knitted little jumpers for the penguins that are undergoing recovery after being contaminated from oil spill.
Beside looking extremely cute and fashionable, on their website they explain how the knitted jumpers help the penguins:

resizedimage350261-Knitted-jumper-lores_2

“When oiled penguins are admitted to the Wildlife Clinic at Phillip Island Nature Parks, a knitted jumper is placed on the penguins to prevent them from preening and swallowing the toxic oil before they are washed and the oil removed by staff.”

They also provide the pattern as a free download on their webite (If you are lazy you can just click here).

I invite all of you to visit their website, and if you don’t know how to knit, you can always donate what you can.

If someone is interested to contrinute, but is put off by the idea to send a parcel to the other side of the world, I am more than willing to organize a collection point and send them all in one single parcel (email me at simply.yarn@gmail.com and we will come up with some ideas).

Now go, and cast one on!